


Tactical Helmet Setup: SF & Civilian Build Guide (2026)

(Updated May 2026)
Quick answer: A workable tactical helmet setup fills five slots: a ballistic or bump shell, a chin strap and pad system, a front NVG shroud and mount, a rear counterweight or battery pack, and ear pro with IFF gear (ID placard or IR strobe). Special-operations builds and civilian builds use the same five slots; only the gear inside each slot changes.
Most helmet setup advice starts with a $4,000 build and works backward. This guide starts with the slots: every working helmet fills the same five positions, whether it is a Tactical Rifleman MICH or a special-operations high-cut. Once you understand the slots, you can budget up from a $300 bump build to a SOF-grade rig without the trial-and-error.
Types of tactical helmets
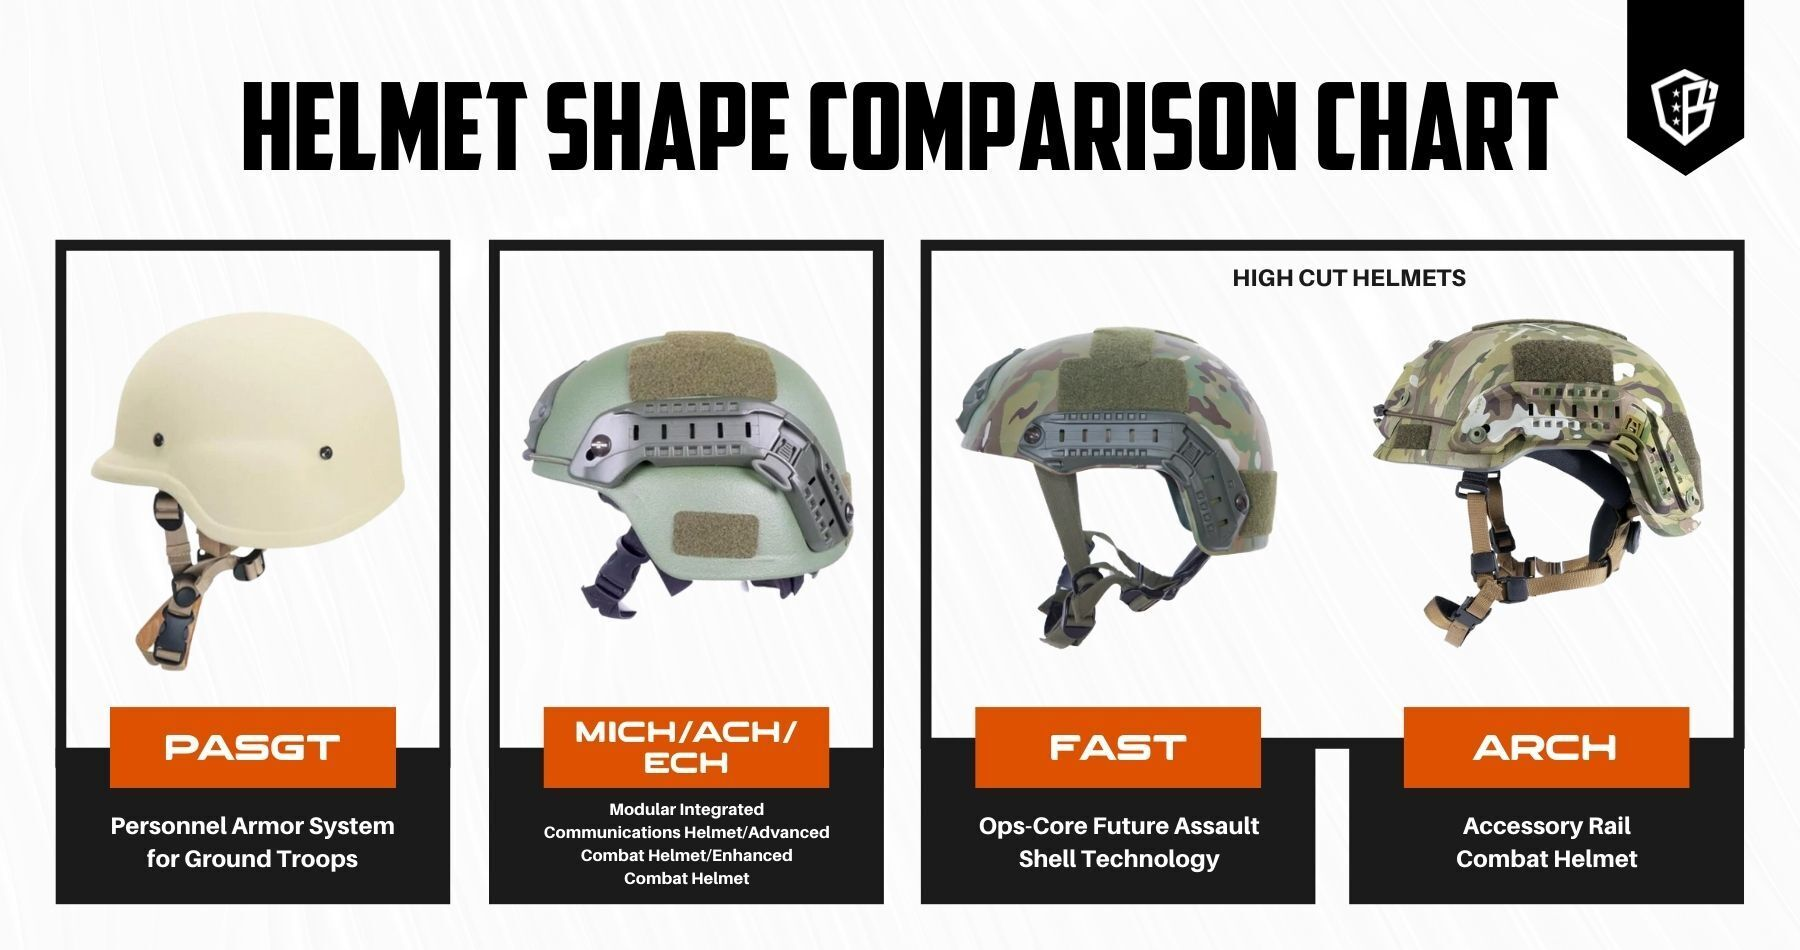
Modern tactical helmets sort cleanly by cut. The cut determines how the shell sits, what accessories fit, and how heavy the rig feels after four hours.
The PASGT is the wide-coverage 1980s standard. Heavier, with a tight ear zone that fights modern over-ear headsets. Plan on a suspension upgrade and a low-profile headset before building anything else on a surplus PASGT.
The MICH/ACH family is the U.S. mid-cut from the early 2000s. It trades a small amount of side coverage for a flatter ear cutout that accepts most over-ear headsets, and shares an aftermarket accessory ecosystem with the Advanced Combat Helmet (ACH).
The high-cut (often a FAST-pattern shell) cuts ear coverage further, accepts integrated rails, and is the dominant SOF-era pattern. You give up lateral coverage in exchange for compatibility with active hearing protection and a lighter overall build.
The Integrated Head Protection System (IHPS) is the Army's ACH replacement. It adds a mandible and visor option and doubles blunt-impact performance at roughly five percent lower base weight.
Ballistic helmets vs. bump helmets
The first real fork is whether you need ballistic protection at all.
Ballistic helmets are tested against threats. Most civilian-market shells carry an NIJ Standard 0101.06 Level IIIA rating, covering handgun threats up to .44 Magnum at the test velocities in the standard. Expect 2.6 to 3.2 pounds for a high-cut shell.
Bump helmets use a non-ballistic polymer shell. They protect against falls and impact during force-on-force training but will not stop a bullet. The Chase Tactical Lightweight Non-Ballistic Bump Helmet is a representative example, with a built-in NVG shroud and accessory rails at roughly half the weight of a ballistic shell.

Civilians who shoot recreationally, train in force-on-force, hunt at night with NODs, or play airsoft generally do not need ballistic protection. They do need a stable platform for hearing protection and night vision; bump helmets are the right answer there. Law enforcement entry teams and military users who anticipate handgun or fragmentation threats want the ballistic shell.
How to set up your tactical helmet

There is no single correct setup. Three variables drive every decision:
- Anticipated threat: ballistic versus blunt impact, day versus night.
- Mission profile: comms requirements and whether you need recording, illumination, or IFF.
- Fit under load: the way the helmet behaves with all of that gear bolted to it. A setup that feels fine empty can become a neck injury at hour three of a prone shoot.
Pro tip: if you do not need it, do not mount it
"That looks cool" is the most expensive accessory in tactical gear. A maxed-out helmet is brutal on your cervical spine. Peer-reviewed work on ballistic helmet neck load shows that mass forward of the center of gravity (NVG-class loads especially) sharply increases sustained neck strain in the prone shooting position. Run only what the mission requires.
The best setup keeps comfort first, starting with size and fit.
How do I find my helmet size?
We covered measurement in detail in our ballistic helmet sizing guide. The short version: have someone else measure the maximum circumference of your head, then check the manufacturer's chart for the recommended shell size.
Too big and the helmet shifts under load and lowers your field of view; too small and it rides up the back of your skull and stops protecting the area it is supposed to cover.
How should a tactical helmet fit?
With the chin strap tightened to operational tension, a properly fitted helmet:
- Stays stable when you shake your head, turn under load, and lower your chin to your chest.
- Feels snug without painfully squeezing your temples.
- Lets you see the front rim of the shell when you look up with your eyes only.
- Is level front to back when viewed from the side.
- Is level left to right when viewed from the front.
Suspension and retention

Two systems do most of the work. The suspension (pads and liners) keeps your skull off the inner shell and absorbs blunt impact. The retention (chin strap and nape pad) keeps the helmet on your head and in the right position. Components include:
- Four-point chin strap with adjustable cradle (the modern standard).
- Pad and liner system, often modular. Mesh liners increase airflow in summer training.
- Counterweight or nape rest at the rear, used to balance forward NVG loads.
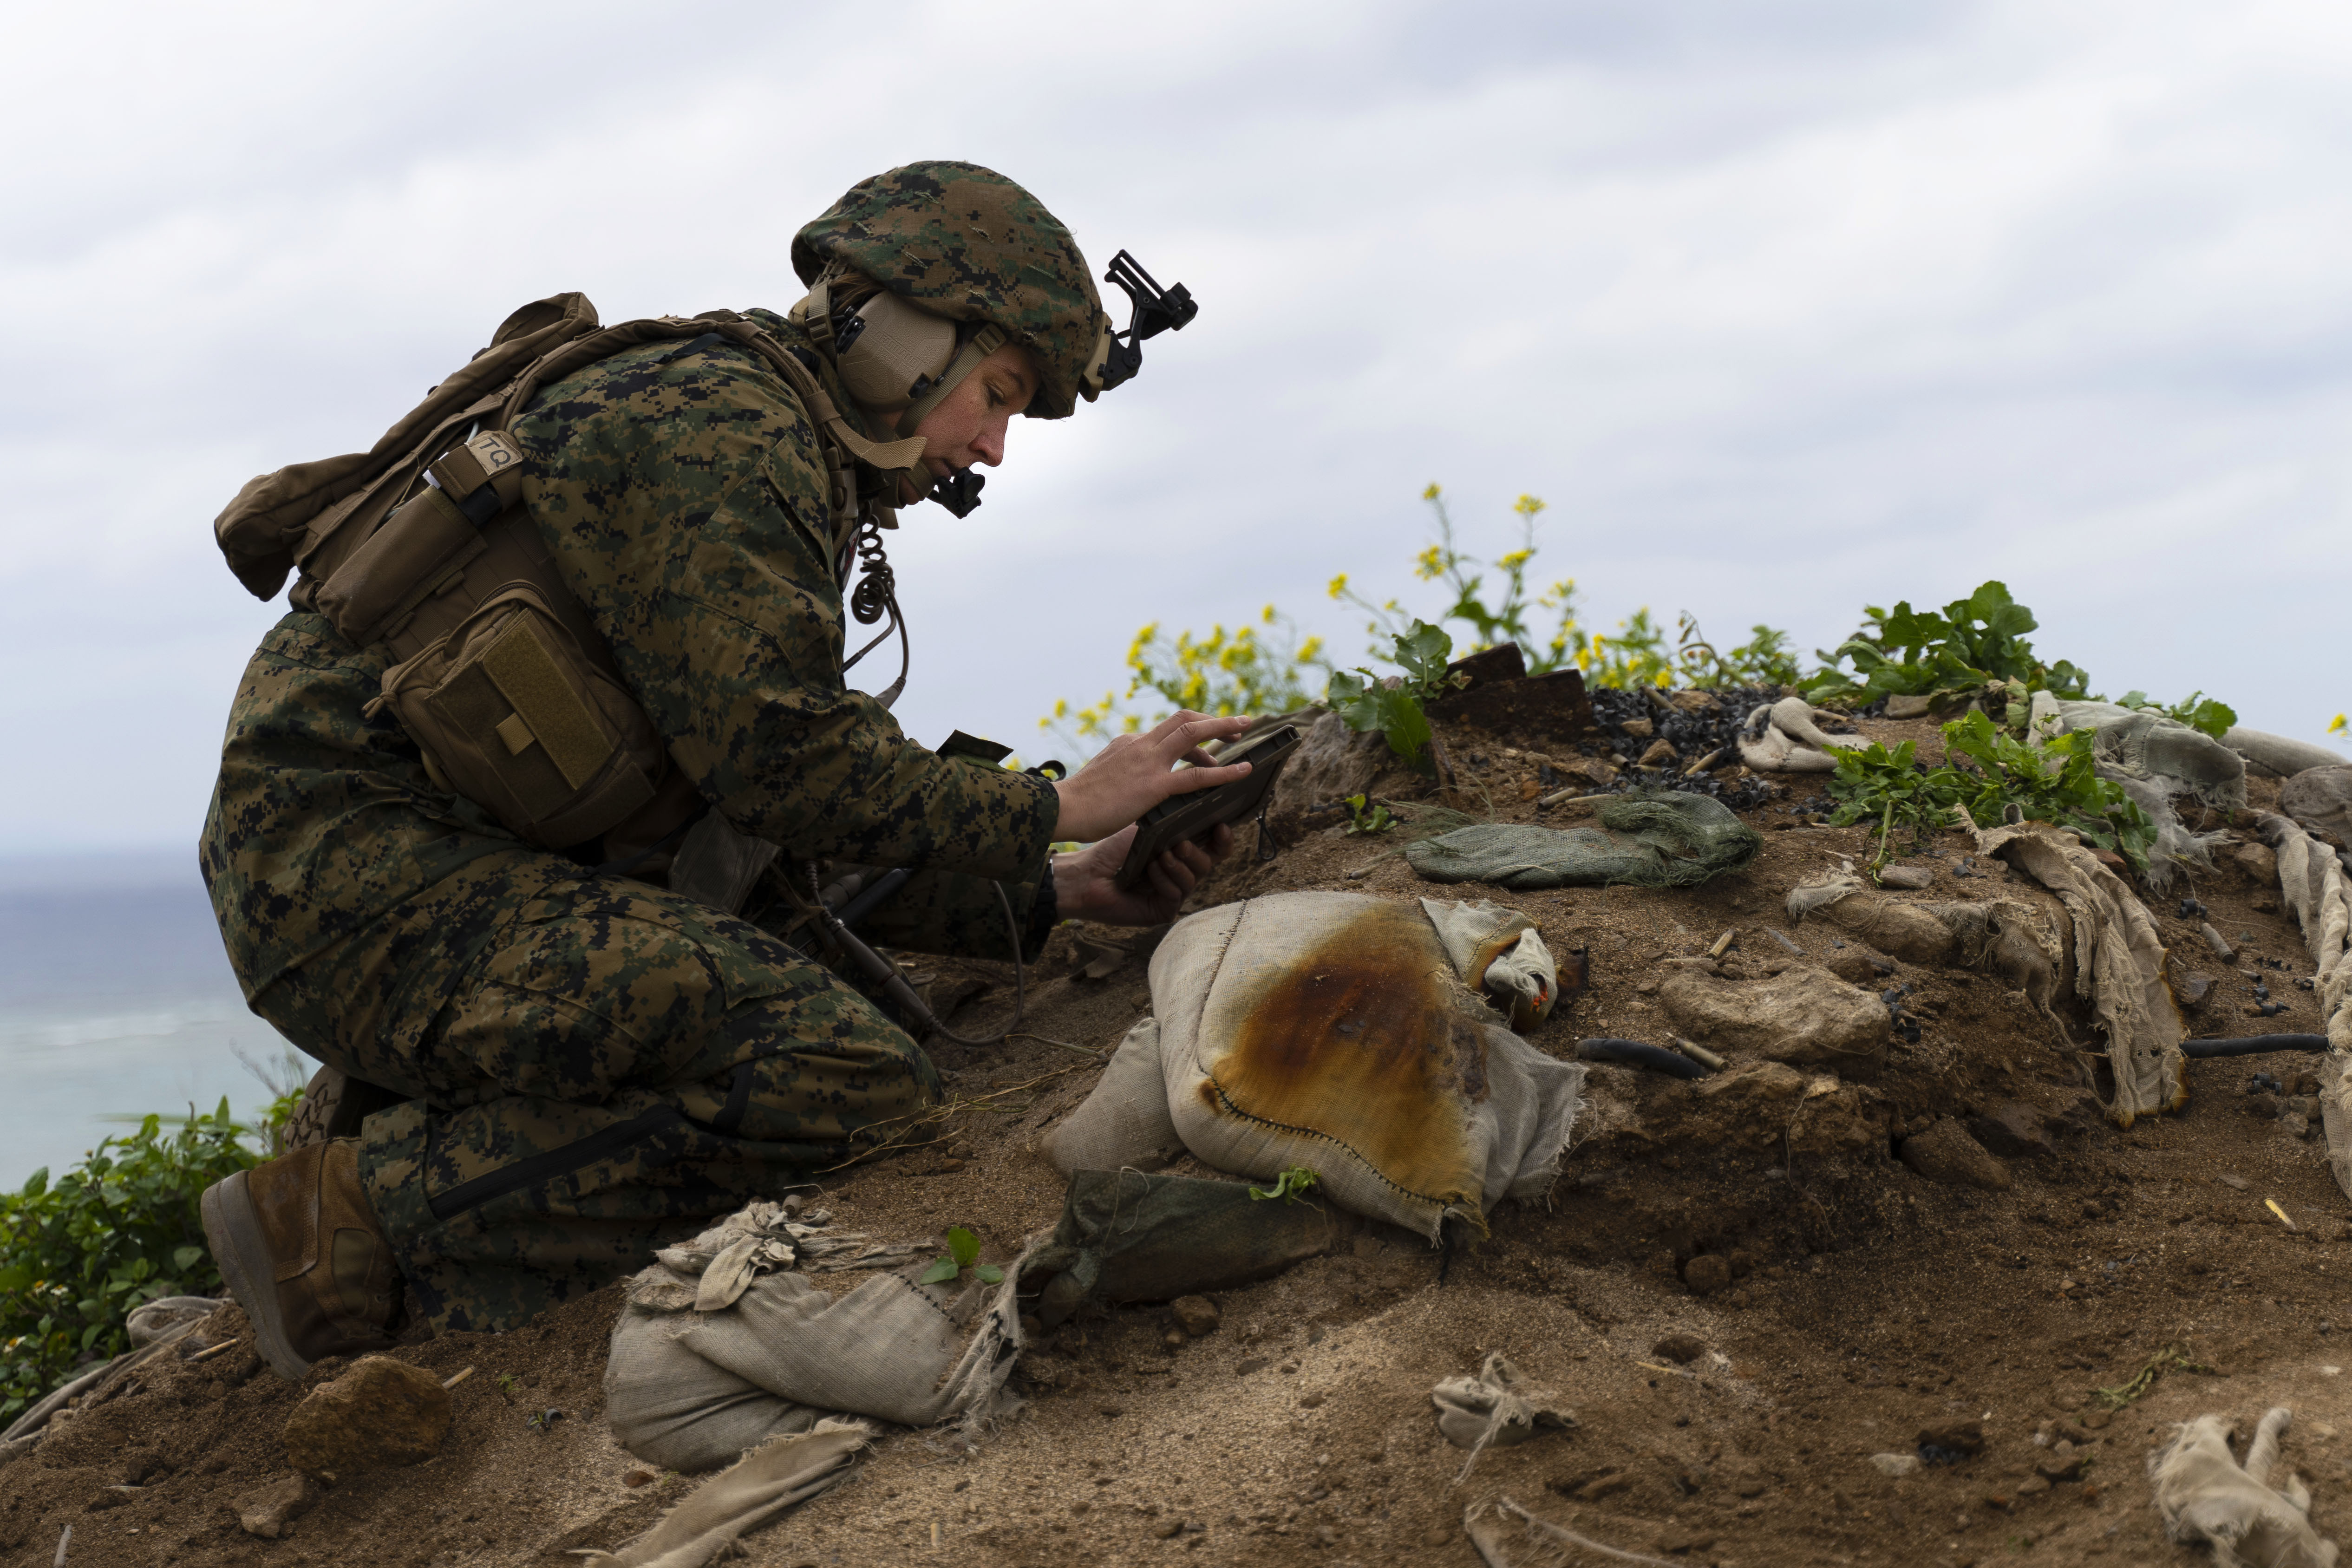
Tactical helmet accessories and what each one does
Rail system
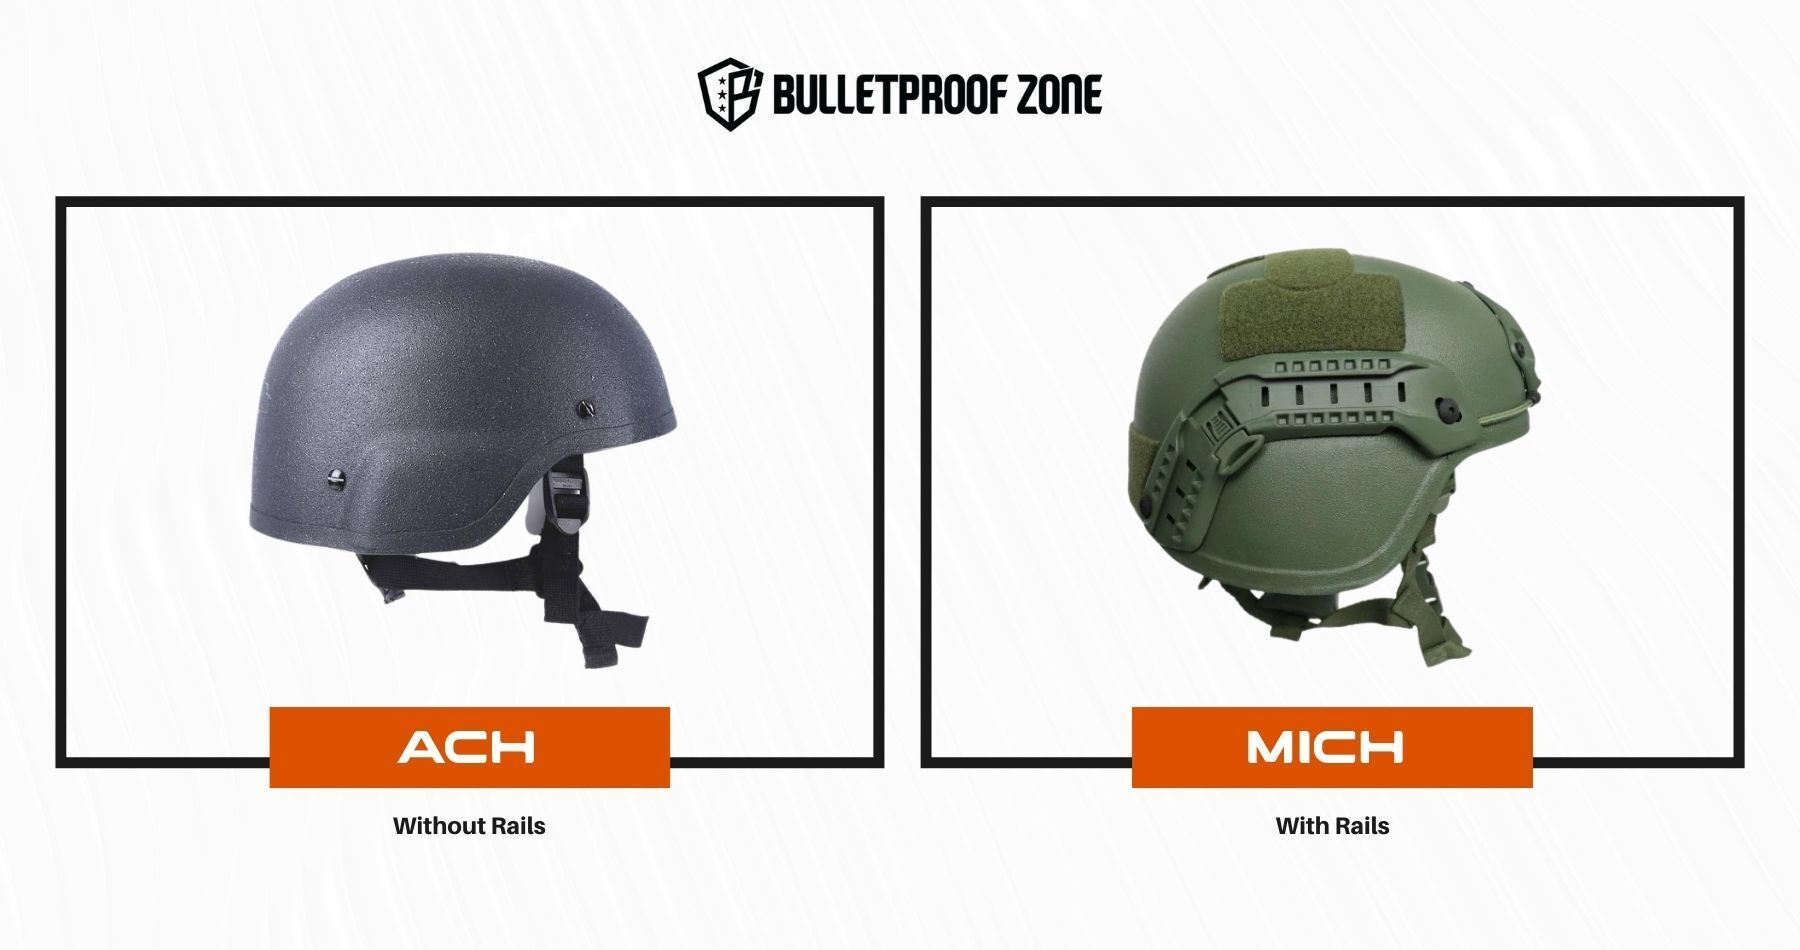
Rails are the side-mount platform for accessories. Most aftermarket helmets ship with rails; legacy ACH and PASGT shells do not. For surplus headgear, add a kit such as the MSA-style ACH rail, which mounts in the existing chin-strap holes.
Night vision shroud and mount

The shroud is the front-of-helmet platform that accepts your night-vision arm. Most current military helmets ship drilled for the standard three-hole MARSOC pattern, which fits the popular Wilcox L4 G24 shroud and most aftermarket equivalents. If your shell lacks the pattern, prefer a press-driven punch over a drill (drilling reduces local ballistic integrity); boltless rail kits avoid new holes entirely.
The mount sits on the shroud and accepts the NVG. The Wilcox G24 dominates civilian and contractor builds and is designed to break away under hard impact so the goggle takes the hit instead of your neck. That is a feature.
Counterweight, battery pouch, and bungees
NVGs and IR illuminators load the front of the helmet. A counterweight pouch at the rear, often loaded with batteries or chem lights, balances the rig and reduces forward pitch. Small bungees clip the goggle housing back toward the shell so it stays put when you turn your head sharply.
IFF: ID placards, morale patches, IR strobes

IFF is harder under NODs because goggles compress facial detail. Flag patches and unit placards mark you to teammates; an IR strobe on top marks you to friendly aircraft and drones running thermal or IR optics.
Helmet covers

Covers protect the shell finish, kill the sheen that develops on bare composite, and add a Velcro and bungee field for mounting. Some are universal; others are cut for a specific shell, like the UARM cover for the UARM HCBH.
Tourniquet

The rear of the helmet is a defensible stowage location for a tourniquet, since a teammate can reach a casualty's helmet faster than the casualty's own pouches in many failure modes. Heat soak and abrasion can degrade the device, so inspect and rotate on a calendar.
Lights, IR illuminators, and cameras
A white light or IR illuminator mounts on the shroud or rails for low-light work. A camera captures evidence and after-action footage. Both are battery loads; build battery counts into your budget.
Eye pro

Eye pro is the most under-respected accessory on most builds. Per Defense Health Agency data, blast pressure and fragmentation are the leading mechanisms of combat eye injury, and ANSI Z87.1-rated lenses meaningfully reduce preventable injury. Battle goggles like the North American Rescue OTW close the gap. Even airsoft should run rated lenses; 6mm BBs cause real corneal damage.
Ear pro and protective communication headsets
Tinnitus is one of the most common service-connected VA disability claims, per the VA's hearing loss and tinnitus guidance. At minimum, run foam earplugs or passive earmuffs every time you train. Active hearing protection (Ops-Core or Peltor) dampens impulse noise and integrates with team radios. On a low-cut PASGT plan for a slimmer-profile headset; on a high-cut, almost any over-ear unit fits cleanly.
Comfort tips that survive a long patrol
- Set the chin strap high on the throat without dragging your jaw down.
- If a low-cut shell plus over-ear headset is squeezing you, pull the side pads out and let the headset cushion handle side support.
- Test multiple pad systems. Aftermarket pad sets often fix complaints that no chin-strap adjustment will solve.
- For a legacy PASGT, an upgrade kit such as the Oregon Aero BLSS kit is the single highest-ROI mod you can make to a surplus shell.
- For clean rail integration on your headset, a rail adapter such as the Hard Head Veterans dovetail rail kit mounts the cups directly to the shell rails and removes the over-the-head band.
Sample tactical helmet setups
The fastest way to internalize the slot model is to look at real builds.
Special Forces setup (Tactical Rifleman)
Carl from Tactical Rifleman runs a deliberately stripped MICH. His public build:
- MICH ballistic shell (side pads pulled for headset clearance)
- Peltor over-ear active headset
- IR strobe and ID placard for IFF, IR illuminator on the rail
- NVG plus Wilcox mount and rear battery pack
Reference video: "How to Setup Your Helmet for Combat" on the Tactical Rifleman channel.
SWAT setup (Qore Performance, Aaron Marco)
Aaron Marco, a SWAT LEO and USPSA Grand Master, walks through his night-work helmet on the Qore Performance channel. His build:
- Ops-Core FAST high-cut shell with Team Wendy harness
- Wilcox three-hole shroud, PVS-31 dual-tube NVG
- TNVC Mohawk counterweight and battery pack (bungees attach to Mohawk)
- IFF strobe, IR illuminator, Because Operator camera
- TCI Liberator II tactical headset
Combat setup (Warrior Poet Society, John Lovell)
John Lovell, formerly of the 75th Ranger Regiment, walks through his civilian-side combat helmet on the Warrior Poet Society channel. His build:
- High-cut shell with Ops-Core AMP active hearing protection
- Wilcox G24 mount with NVG (TNVC Sentinels in the original video)
- TNVC Mohawk counterweight, spare batteries, IR lights
- Eye protection (Gargoyles) and luminescent IFF tape
The full helmet section in Lovell's "Full Combat Setup" video starts around 14:27.
How much does a helmet setup cost?
Plan in three brackets, before tax and shipping (2026 retail bands).
| Tier | Shell | NVG / mount | Comms / ear pro | IFF, lights, batteries | Realistic total |
|---|---|---|---|---|---|
| Entry / training | Bump $250 to $400 | None or PVS-14 single tube starting around $2,500 | Foam or passive muffs $20 to $80 | $80 to $150 | $350 to $3,150 |
| Mid / civilian build | Level IIIA high-cut $400 to $900 | PVS-14 plus Wilcox G24 $3,000 to $4,500 | Active over-ear $400 to $900 | $200 to $400 | $4,000 to $6,700 |
| Pro / SOF-style | Ops-Core FAST or equivalent $1,000 to $1,800 | Dual-tube PVS-31 plus mount $11,000 to $16,000 | TCI / Ops-Core AMP $1,200 to $2,000 | $400 to $800 | $13,500 to $20,500+ |
Night vision is the dominant line item at higher tiers, not the shell. NVG cost scales with tube generation and image-intensifier grade.
Where tactical helmets are going next
Better blunt impact, fuller-head coverage, lower weight
The U.S. Army's Integrated Head Protection System (IHPS) shows where helmet performance is heading: roughly double the blunt-impact protection of the ACH at about five percent lower base weight, with a mandible-plus-visor option for face and jaw coverage. Fielded since 2019. Ongoing program goals include further weight reduction and integrated head-trauma sensing.

Rifle-rated civilian shells
Legacy Safety and Security and others continue pushing toward rifle-rated civilian helmets. Boron carbide and ultra-high-molecular-weight polyethylene have narrowed the weight trade-off, and Level III and Level IV shells are commercially available, though weight still bounds the design space.

Frequently asked questions
What is the best tactical helmet setup for a civilian?
For a civilian who does not need ballistic protection, a bump helmet with rails, a low-cost shroud, active hearing protection, and either a single-tube PVS-14 or a quality flashlight covers most use. For handgun threats (entry training or security work), step up to a Level IIIA high-cut shell.
What does Special Forces use for helmet setups?
Current U.S. Special Operations users typically run a high-cut FAST-pattern ballistic shell with a Wilcox shroud and G24 mount, dual-tube NVGs (PVS-31 family), active hearing protection, an IR strobe and ID placard for IFF, plus a rear counterweight and battery pack. Kit varies by unit; the slot pattern is consistent.
Is a bump helmet good enough for airsoft and training?
Yes. Bump helmets are designed for blunt impact rather than bullets; force-on-force or airsoft training does not need a ballistic shell. A bump helmet plus rated eye and hearing protection is the right answer at a fraction of the cost.
How much does a complete tactical helmet setup cost in 2026?
Entry training builds run roughly $350 (bump shell with passive ear pro) to $3,000 (bump shell with single-tube PVS-14). A mid-tier civilian build with a Level IIIA high-cut and active comms falls between $4,000 and $6,700. SOF-style builds with dual-tube NVGs start around $13,500.
Can I drill an NVG shroud into a helmet that did not come with one?
You can, but a press-driven punch is preferable to a drill. Drilling reduces local ballistic integrity around the new holes. Boltless rail-and-system kits and bonded shrouds avoid the issue.
Do I need a counterweight if I run NVGs?
For most users, yes. Forward-loaded NVGs shift the helmet's center of gravity forward and increase neck strain in the prone shooting position. A rear counterweight pouch brings balance closer to neutral and is one of the cheapest comfort upgrades on the helmet.
What ballistic rating do most tactical helmets carry?
Most civilian-market ballistic helmets are rated to NIJ Standard 0101.06 Level IIIA, which covers handgun threats up to .44 Magnum at the test velocities listed in the standard. Rifle-rated (Level III and IV) helmets exist but are heavier and more expensive.
Key takeaways:
- Every tactical helmet setup fills five slots: shell, retention/suspension, front mount (shroud and NVG), rear balance (counterweight or battery pack), and ear pro plus IFF.
- Pick ballistic for handgun-threat work, bump for training and force-on-force.
- Forward-loaded NVGs require a rear counterweight to keep neck load manageable.
- Night vision is the dominant cost on a finished build, not the shell.
- Special-operations and civilian builds use the same slots; only the gear inside each slot changes.
Disclaimer: This article is for informational purposes only. No body armor or ballistic helmet provides complete protection against all threats. Performance ratings (NIJ Standard 0101.06 Level IIIA) reflect specific test conditions, not real-world guarantees. Verify both rating and serviceable fit before relying on any protective equipment. For purchase questions, contact the Bulletproof Zone team.