Chest Rig Setup Made Easy: From Beginner to Pro in No Time!
Setting up your chest rig may feel overwhelming, but it doesn’t have to be. Personalizing your rig should be an enjoyable process. It’s a chance to experiment with pouch placements, try out different hydration setups, and find the ideal spot for your favorite patch. 
Without a plan, it can seem like a lot to manage. However, we’re here to help. We’ve put together a detailed guide to help you set up your chest rig based on your personal preferences and mission requirements. Our guide will assist in making sure your chest rig setup is ready for any challenge you face.
What's the Difference Between a Chest Rig and a Plate Carrier?
Chest rigs and plate carriers are two important pieces of tactical gear that serve distinct purposes. So, what sets the two apart from one another?
Chest Rig
A chest rig is lightweight and designed for carrying ammunition and key items. It features a harness with pouches and MOLLE webbing for customization. Chest rigs are ideal for high-mobility operations. They offer better ventilation and less weight, enhancing comfort and endurance.
Plate Carrier
A plate carrier holds ballistic armor plates and protects against bullets and shrapnel. While it can also carry gear, its primary function is protection. Plate carriers are heavier due to the armor plates but bring protection in high-risk environments.
Selecting the Right Chest Rig
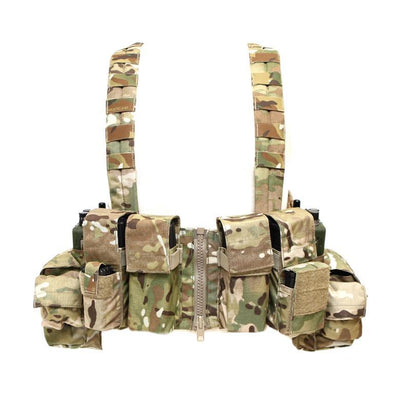
The first step in setting up your chest rig is selecting the right one for your needs. There are three main factors to evaluate when choosing the right chest rig: your needs, your loadout, and fit.
Determine Your Needs
Not every chest rig is capable of meeting the different needs of every mission. To make sure you have the right chest rig, you need to know what you will be using it for.
There are many reasons to wear a chest rig. However, not all of them involve combat or the expectation of combat. Chest rigs are also great for extremely long hikes. Chest rigs can carry medical equipment, food, hydration sources, compasses, maps, etc.
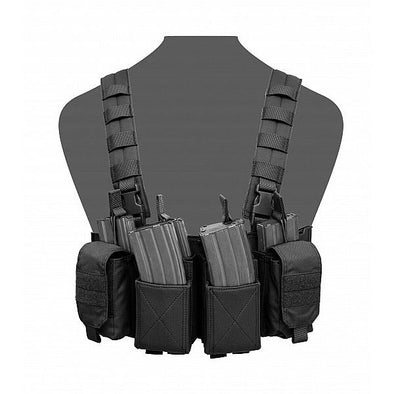
No matter the mission, we recommend the Warrior Assault Systems Pathfinder Chest Rig for its adaptability to nearly any mission requirement. As a chest rig, the Pathfinder can hold four M4-style magazines with an adjustable bungee retention system. This system enables easy swap out of AK magazines.
The Pathfinder can also be combined with the Warrior’s new Recon Plate Carrier System by simply removing the rear and shoulder straps. The Pathfinder is a great option for beginners and pros alike.
Assess Your Loadout
When planning your loadout, it's necessary to consider the type of equipment and gear you'll be carrying. You should also think about the size, shape, and quantity you'll need. This will determine placement, choice of pouch size and number, and how your gear attaches to your rig.
Proper Fit
Once you've determined your needs and proper loadout, you'll want to make sure the chest rig you've chosen is a comfortable fit. Make sure the size is right, sits properly on your torso, and doesn't hinder movement.
A major feature of chest rigs is the mobility they provide despite all the gear you're wearing. This is because they allow for even weight distribution. Wearing a chest rig that doesn't move with you defeats its purpose.
Choosing and Arranging Pouches
When selecting pouches, you'll be glad you considered your loadout needs when choosing your chest rig. Unfortunately, no single pouch can cover all your requirements.
A prime example is AK pouches versus standard magazine pouches.
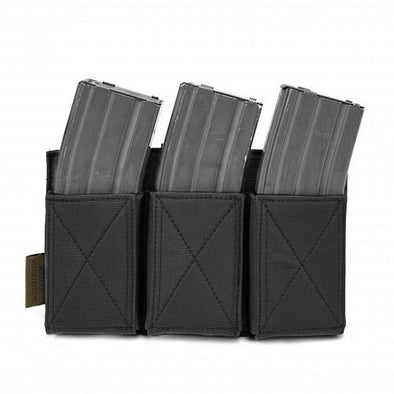
The AK magazine is slightly longer than most weapons of similar caliber. As a result, modern chest rigs can typically carry 3 AR15-style pouches. However, due to the longer length of AK magazines, only 2 AK-style pouches will fit.
We mentioned earlier that the Warrior Assault Pathfinder Chest Rig supports pouches with a bungee retention system. These Warrior Assault Systems Triple Elastic M4 & AK Mag Pouches are a great option if you expect to carry different ammunition types.
Prioritize Accessibility
Place your most frequently used items in the easiest-to-reach spots. For example, mag pouches should be positioned where you can quickly access them with your non-dominant hand. Consider the different types of ammunition you’ll carry. Then, make sure you have mag pouches for both rifle rounds and pistol magazines.
Side pouches are best suited for other gear such as medical supplies, navigation tools, and other essential gear. The placement of your pouches should allow for easy access.
Balance Your Load
Distribute the weight evenly across your chest rig to avoid fatigue and maintain balance. A lopsided rig can hinder your movement and cause discomfort with extended wear.
Place heavier items, like a radio or a first aid kit, towards the center of your chest. If needed, split the gear in your side pouch into two pouches.
Customize Your Gear Setup for the Mission
Your pouch arrangement may change depending on your mission or activity. A setup for a shooting competition might differ from one for a field operation. Be flexible and adjust your pouches as needed to suit the task at hand.
This is one of the great benefits of MOLLE webbing. Your pouches will stay securely attached to your rig for stability. At the same time, you can easily adjust the position of a pouch or two without much hassle. Be aware that you will need to remove the chest rig to do this. It's inconvenient to attempt to swap out a pouch while the rig is worn.
Attaching Accessories
Accessories are the best part of any chest rig setup. Accessories include medical supplies, GPS units, shovels, knives, hydration systems, and communication devices. Often, these accessories can attach to your gear in a variety of ways for a smooth and effective chest rig setup.
Radios and Communication Gear
Communication devices are necessary for many operations. Attach your radio to a place where it's easy to access and operate. Think about using a radio pouch with a secure retention system to keep your device safe.
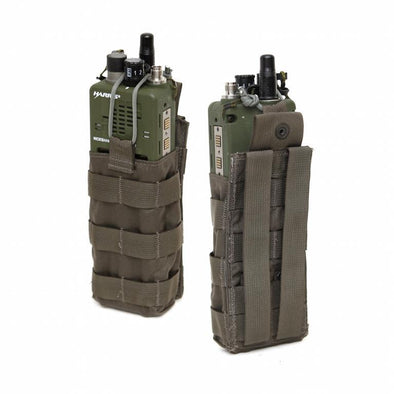
The LBX Tactical Radio Pouch is perfect for keeping your radio where it's supposed to be.
Additionally, routing the cables through the shoulder straps can prevent them from snagging. If you're right-handed, position your radio on the left side for easy access, and if you're left-handed, place it on the right. This will allow you to operate the radio while still leaving your dominant hand free to hold your weapon.
Hydration Systems
Staying hydrated is important, especially during prolonged activities. Many chest rigs are compatible with hydration bladders. Attach the bladder to the back of your rig and route the drinking tube over your shoulder for easy access.
It’s personal preference on which side you have the tube placed. If possible, adjust it so you can access it with your mouth, allowing for hands-free use when needed. This will help keep your hands free without sacrificing hydration.
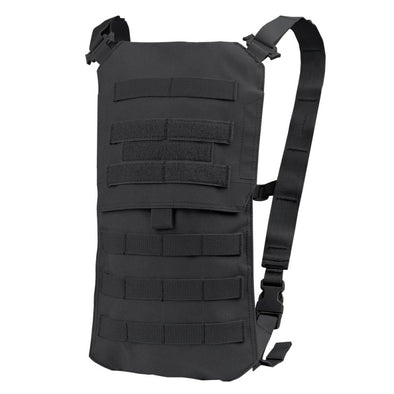
If you require a hydration system or need an upgrade, the Condor Oasis Hydration Carrier is a perfect choice. Its insulated interior will keep you liquid cool in the heat. Thanks to the four mod straps, the Oasis hydration system can be worn alone or attached to another pack or rig.
Utility and Tool Pouches
Attach utility pouches for carrying tools, multi-tools, or additional gear. These pouches can be placed on the sides or lower sections of your chest rig. Make sure they are securely fastened and do not interfere with your primary equipment.
Adjusting Chest Rigs Comfort and Efficiency
Once you have assembled all your gear it's time to make sure your equipment is comfortable and easy to move around in. This is important especially if you expect to be wearing this for extended periods. Follow these steps for a proper and comfortable fit.
Step One: Initial Setup
Before putting on your chest rig, lay out all the equipment you plan to carry. This includes ammunition pouches, communication devices, medical kits, hydration systems, and any other accessories.
Inspect the chest rig for any manufacturing defects, loose stitching, or other issues that might affect its performance. Making sure your gear is in good condition is a priority before you start.
Step Two: Put on the Chest Rig
You should wear appropriate clothing, such as a base layer shirt, to prevent chafing and enhance comfort. Slip the rig over your head and secure it around your torso. Adjust the shoulder straps so that the rig sits comfortably on your chest. Proper initial placement will make further adjustments easier and more effective.
Step Three: Adjust the Shoulder Straps
Pull on the shoulder straps to tighten them. The rig should sit high on your chest, but not too high that it restricts movement or breathing. The weight should be evenly distributed across your shoulders. If the rig feels lopsided, adjust the straps accordingly. This balance is key to avoiding discomfort and strain.
Step Four: Adjust the Side Straps
Use the side straps to secure the rig around your torso. The rig should be snug but not too tight that it restricts your movement or breathing. Move around to make sure the rig stays in place and doesn’t shift excessively. This helps to maintain stability and comfort during active use.
Step Five: Test Mobility and Fit
Test various movements, such as bending, crouching, and reaching. This helps check if the rig hinders your mobility. If the rig feels uncomfortable or restricts movement, readjust the straps and pouch placements. Freedom of movement is necessary for operational efficiency and comfort.
Step Six: Practice Wearing the Rig
Spend some time wearing the rig to get used to its weight and feel. Make any final adjustments to enhance comfort and efficiency after wearing the rig for a while. This practical step helps you identify and correct any minor discomforts or inefficiencies.
Step Seven: Maintain Your Chest Rig
Periodically check the rig for signs of wear and tear. Keep the rig clean and properly maintained so that it remains in good working condition. Regular maintenance prolongs the life of your gear and helps it perform reliably when needed.
Gear Check for an Effective Chest Rig Setup
Once you're done, make a checklist of every item and where it is placed on your rig. Before wearing your chest rig, make sure that all gear and required equipment are accounted for. A checklist is the best way to do this.
Going over your checklist is the last step in setting up your chest rig. Congratulations! Your rig is good to go!
Always remember when setting up your gear to think in terms of maneuverability, comfort, accessibility, and efficiency. Magazine pouches should be in the front. Radios and heavier items should be towards the center with the whisper mic on your non-dominant side. Also, hydration systems should be accessed hands-free.
With these tips in mind and your trusty checklist, you can finally customize your gear the way you want it. Have fun doing it. It's your rig, you should be proud of the work you put into it!
Bulletproof Zone supplies high-quality chest rigs designed for efficient gear organization and quick access in any tactical situation. Our chest rigs are built for durability and functionality, trusted by both professionals and civilians. Check out our selection of chest rigs today and get to customizing!


